Moving From cPanel/WHM to Webmin/Virtualmin
This post will discuss what we learned moving from cPanel/WHM to Webmin/Virtualmin. We had some small hiccups doing the transfer but it was smooth overall and want others to also be able to make the transition.
For those who don’t know, cPanel is a Web Hosting Control Panel that has been around since 1996. They recently rolled out a new account-based pricing structure that no other company in the industry has. Critical Web Solutions was using cPanel for over 3 years and once we got news of the price increase in 2019, we’ve been looking for alternatives since. We only manage a few sites and our rise in cost was not that heavy. Although we’ve heard that some companies were hit with a 200-300% increase in pricing which is insane.

We considered a few different web hosting control panels such as Froxlor or Ajenti, but none suited us better than Webmin. Additionally, Virtualmin is an extra module or extension that makes it easy to automate tasks/processes such as cron jobs or email filtering. It provides you additional access the same way that WHM does with cPanel. There is a pro version of Virtualmin that is a paid service with support, but we opened only a few tickets in the years we used cPanel and don’t expect needing any help.
THE STEPS TAKEN
Let’s go over the steps we took in moving our sites from one server to another.
1 – Create full backups of all sites hosted on cPanel.
When you login to cPanel, go to Backup –> Download a Full Account Backup. Do this for all your sites and the simplest way is to download it to your computer.
2 – Launch an AWS Ec2 instance with Webmin installed.
We use AWS for hosting our files, although we totally recommend WP Engine for your hosting needs. In the end, we will need to update our records with the new Elastic IP address and replace the one used on our old instance.
3 – Login to the new server and install Virtualmin.
As we said before, Virtualmin is a plugin for Webmin that simplifies the management of your virtual hosts; aka your websites. We are assuming you know how to use the terminal for downloading and installing the files needed to get this baby working.
This command is needed to download virtualmin
wget https://software.virtualmin.com/gpl/scripts/install.sh
Note: if you get wget is not a command…try yum install wget
This command is needed to install virtualmin
chmod +x install.sh
Then
./install.sh
Note: if you are not the root user…you may need to use sudo before the commands
After the install is done, login to your Virtualmin area dashboard via https://youripaddress:10000 with the root password you created on your AWS instance. You should see 2 tabs with Webmin and Virtualmin
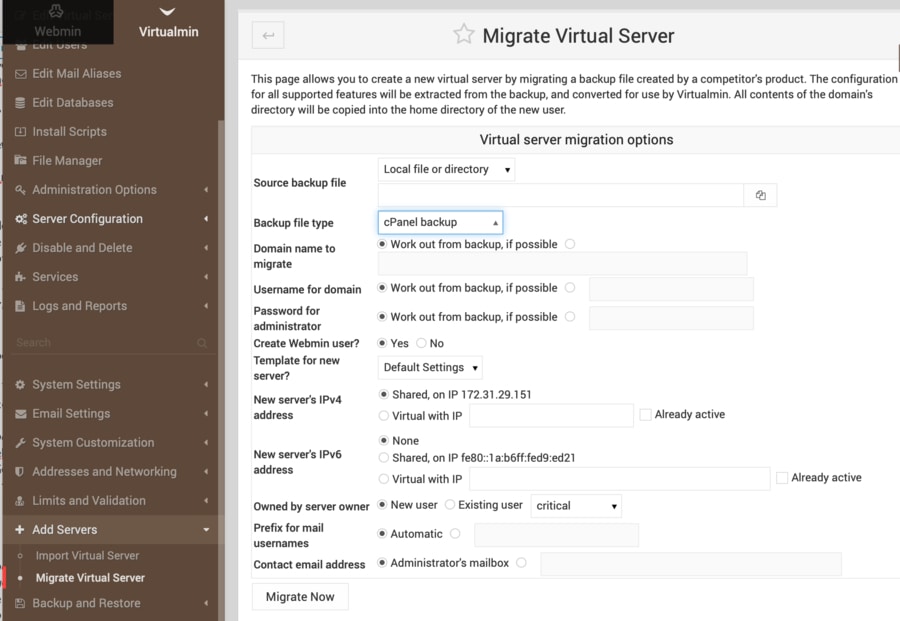
4 – Upload cPanel backups
After logging in to your Webmin server we can upload the backups we downloaded via ftp or wget option(from you computer) Go to the Virtualmin tab and click on the option to “Add servers” shown on the left side panel. Then click on “Migrate Virtual Server” option. Simply select the backup and click migrate and watch the magic happen. You dont need to worry about all the other options available; Webmin and Virtualmin know whats best for you.
5 – Update domain registrar nameservers.
Our last step is to update our domain registrar nameservers and have them point to the new Ip Address. We use a couple of registrars including Namecheap, whom we highly recommend for your domains.
Here is a link to save on domains with Namecheap in case you’re interested Once this is done, it will take some time before the change happens, but you can check if your records have been updated using this tool: https://www.ultratools.com/whois
THE ISSUES WE FACED
We had a few things come up that made us a little nervous, but we at CWS never panic cause we are pros! Let us go over the main ones.
Issue 1 – Https not working
We first had an issue with accessing the https version of the site. It was simply a matter of enabling it in the dashboard. You would need to go to Edit Virtual Server –> Enabled Features page and select Apache SSL website enabled. After making that change, request a free Let’s Encrypt certificate from theServer Configuration –> SSL Certificate page. Here is documentation from the Virtualmin site for more on getting this done: https://www.virtualmin.com/documentation/id%2Cssl_and_virtualmin
Issue 2 – Email sending
Usermin is a plugin used for emails and is accessed on https://youripaddress:2000 by default. What we need to do is ensure that in System Settings -> DNS Records, the MX record points to the IP address of your server. We should note that there are two areas involved with email routing:
Postfix is for sending out and receiving mail (SMTP)
Dovecot is for fetching and reading it (POP3, IMAP)
Issue 3 – Backend goes to the wp-install page
What this meant is that there was no connection to our database so WordPress thought this was a new site that needed a database. This happened because there was an issue is with the versions of MySQL being different. The database version that was exported came from a higher MySQL version so collation was different. This was fixed by changing the collation from utf8mb4 to utf8 on the database and re-uploading the file.
If you would like us to assist in moving your servers from cPanel, feel free to ping us with a message and let us know what you need done.
